This tutorial covers:
- What is Scribus?
- How to Download Scribus With Google Chrome
- How to Download Scribus With Firefox
- How to Install Scribus
- How to Open Scribus With Shortcut
- How to Open Scribus With Search
- How to Pin Scribus to the Taskbar With Search
- How to Pin Scribus to the Taskbar With Right Click
- How to Pin Scribus to the Taskbar From Start
- How to Pin Scribus to Start
- How to Uninstall Scribus
No time to scroll down? Click through this presentation tutorial:
Follow along with this tutorial video:
What is Scribus?
Scribus is a free page layout editing program. With Scribus, create books, newsletters, brochures, PDFs, and more. As an open source software, Scribus works with Windows, Linux, and mac OS. Create and publish documents from scratch, or edit one of the many Scribus templates.
How to Download Scribus With Google Chrome
- Step 1: Double click the Google Chrome shortcut to open the Google Chrome browser.

- Step 2: Go to a search engine website. For example, click the address bar at the top, type "google.com", and press Enter.

- Step 3: On the search engine website, click the search bar, type "scribus" and press Enter.

- Step 4: Click the "SourceForge.net" result.

- Step 5: Click the green "Download" button.

- Step 6: In the Google Chrome Downloads window that opens, click the "Open" button.

- Step 7: If the program asks for permission to make changes to the computer, click "Yes". In the window that opens, click the drop-down menu to select a language, and click "OK".

- Scribus is now ready to install. Please see How to Install Scribus.
How to Download Scribus With Firefox
- Step 1: Double click the Firefox shortcut to open the Firefox browser.

- Step 2: Go to a search engine website. For example, click the address bar at the top, type "google.com", and press Enter.

- Step 3: On the search engine website, click the search bar, type "scribus", and press Enter.

- Step 4: Click the "SourceForge.net" result.

- Step 5: Click the green "Download" button.

- Step 6: In the window that opens, click "Save File".

- Step 7: Click to select a save location, such as the Desktop, and click "Save".

- Step 8: In the upper right, click the "Minimize" or "-" button.

- Step 9: Double click the Scribus installer shortcut.

- Step 10: If the program asks for permission to make changes to the computer, click "Yes". In the window that opens, click the drop-down menu to select a language, and click "OK".

- Scribus is now ready to install. Please see How to Install Scribus.
How to Install Scribus
- Step 1: In the "Scribus Setup" window, click the "Next" button.

- Step 2: Click "I accept the terms of the License Agreement" and click "Next".

- Step 3: Click "Next" twice.

- Step 4: Click "Install".

- Step 5: After Scribus installs, click "Finish".

How to Open Scribus With Shortcut
- Step 1: Double click the Scribus shortcut.

- The Scribus program opens.

How to Open Scribus With Search
- Step 1: Go down to the taskbar and click the Start (four blue squares) button.

- Step 2: In the Start window that opens, click the top search bar and type "scribus".

- Step 3: On the search results screen, click one of the following buttons:

- The Scribus program opens.
How to Pin Scribus to the Taskbar With Search
- Step 1: Go down to the taskbar and click the Start (four blue squares) button.
- Step 2: In the Start window that opens, click the top search bar and type "scribus".
- Step 3: On the search results screen, click "Pin to taskbar".

- Step 4: Click the pinned Scribus app icon to open Scribus.

- The Scribus program opens.
How to Pin Scribus to the Taskbar With Right Click
- Step 1: First open Scribus. Right click the Scribus app icon on the taskbar.

- Step 2: In the menu that opens, click "Pin to taskbar".

How to Pin Scribus to the Taskbar From Start
- Step 1: Go down to the taskbar and click the Start (four blue squares) button.
- Step 2: In the Start window that opens, right click the pinned Scribus app icon (if Scribus is not already pinned to start, see "How to Pin Scribus to Start").

- Step 3: In the menu that opens, click "Pin to taskbar".

- Step 4: Right click the pinned Scribus icon on the taskbar.

- Step 5: In the menu that opens, click "Scribus" to open the app.

- The Scribus program opens.
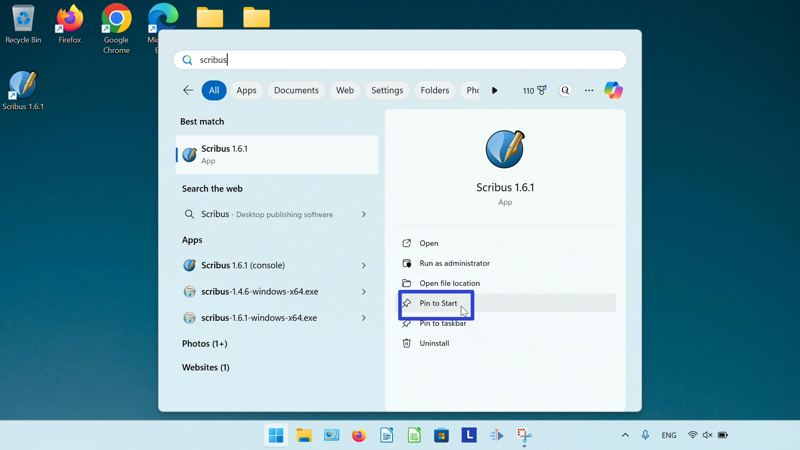
How to Pin Scribus to Start
- Step 1: Go down to the taskbar and click the Start (four blue squares) button.
- Step 2: In the Start window that opens, click the top search bar and type "scribus".
- Step 3: On the search results screen, click "Pin to Start".
- Step 4: Click the Start button twice. In the Start window that opens, click the pinned Scribus icon to open the app.

- The Scribus program opens.
How to Uninstall Scribus
- Step 1: Go down to the taskbar and click the Start (four blue squares) button.
- Step 2: In the Start window that opens, click "Settings".

- Step 3: In the Settings window that opens, go to the left menu and click "Apps".

- Step 4: At the top of the window, click "Installed apps".

- Step 5: Click the search bar and type "scribus".

- Step 6: Go to the Scribus section and on the far right side click the "Menu" or "..." button.

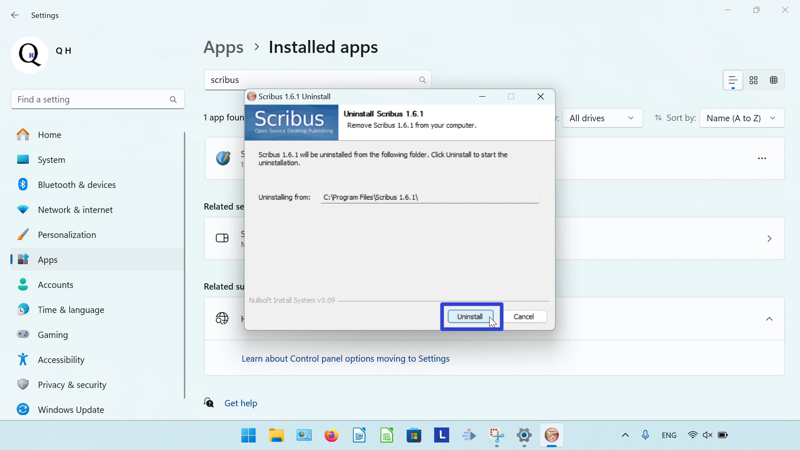
- Step 7: In the menu that opens, click "Uninstall".

- Step 8: In the window that opens, click "Uninstall".

- Step 9: If the program asks for permission to make changes to the computer, click "Yes". In the window that opens, click "Yes".

- Step 10: Click "Uninstall".
- Step 11: Click "OK".

Save a copy of these instructions for later with this free PDF tutorial.